Pages

Thursday, October 17, 2013

Roasted Vegetables

News flash: I love vegetables. Like, I'm having a love affair with vegetables at the moment. Raw, roasted, sautéed, I will eat them like they're going out of style. And since the temperature here in LA dropped (marginally) last week, I decided that it was officially fall, and time to roast some veggies.


Roasting a pan of vegetables is nothing new for me. There have been times at home where my mom and I roast a few pans and stand over the finished product, fishing out the best bit of parsnip or the nicest morsel of zucchini. Feeling nostalgic and sweater-weather oriented, I went to the grocery store and stocked up.

A great thing about roasting vegetables is that you can choose almost any vegetables that you'd like. My only advice is to go for hardier vegetables, since they'll hold up to the roasting better than, say, a tomato. Or a cucumber. You catch my drift. Yeah?


You will need:
 -1/2 an eggplant (mine was a medium-ish one)
 -2 sweet potatoes
 -1 red onion
 -1 head of garlic
 -1 cup of brussels sprouts (approximately 10 sprouts)
 -2 cups of broccoli
 -1/4 cup of olive oil
 -salt, to taste
 -pepper, to taste
 -5 shakes of dried basil
 -5 shakes of dried oregano

Oven temp: 375˚F.


Obviously, this is super customizable. You can add carrots, parsnip, zucchini, potato... the list goes on and on! However, this is what my store had, so that's what went in. Boom, easy as that.


We'll start with the garlic. Mmm, garlic. Roasting garlic is a life skill, I believe, and it's so easy that everyone should know how to do it. Start by chopping the top 1/2 inch off of your head of garlic. All you want is for each clove to be exposed.


Next, place the cut garlic onto a sheet of tin foil. Pour a solid glug of olive oil onto the garlic, making sure you're evenly covering each clove. You don't want to drown the head though! You'll probably pour at maximum about a tablespoon of oil on.


Now take the edges of the tin foil and make a little airtight hat over the garlic. The idea here is to steam/roast the garlic at the same time. What'll happen while the garlic cooks is that it will become super soft, deliciously fragrant, and wonderfully gentle in flavor. Put it in the oven along with your vegetables and leave it there for about an hour. Check every now and then to make sure it's not burnt (highly unlikely), but make sure you seal it back up after you've snuck a peek!


It will look like this when it's done. It will shrink in size and darken in color. Just squeeze the garlic out of the skin and you're ready for action!


Now for the main attraction! It's extremely easy to roast vegetables. All you need to do to start is to chop everything into rough chunks. I leave the broccoli as is, slice the brussels sprouts in half, and the onion into ninths (thirds then thirds again). Throw it all into a large ziploc bag.


Add your 1/4 cup of olive oil, salt, pepper, basil, and oregano. Then close the bag tightly (you do NOT want oily vegetables flying willy-nilly over your kitchen. Trust me on that one) and shake it on up. You want to get the oil and spices evenly distributed over the vegetables. Shake it up, then shake it more.


Now, dump the vegetables out of the bag and onto a baking sheet. You don't need to grease the sheet or anything, since the vegetables have their own oil. Give the sheet a good shake to settle all the vegetables, then you're good to go!


Pop these beauties in the oven, along with your little garlic bomb, for about thirty minutes. Take them out at this point and stir them around, making sure that each bit is getting flipped or turned so it gets evenly cooked. Then, put the vegetables back in the oven for fifteen or twenty minutes more. Garlic will stay in for another half hour, for a total cook time of one hour.


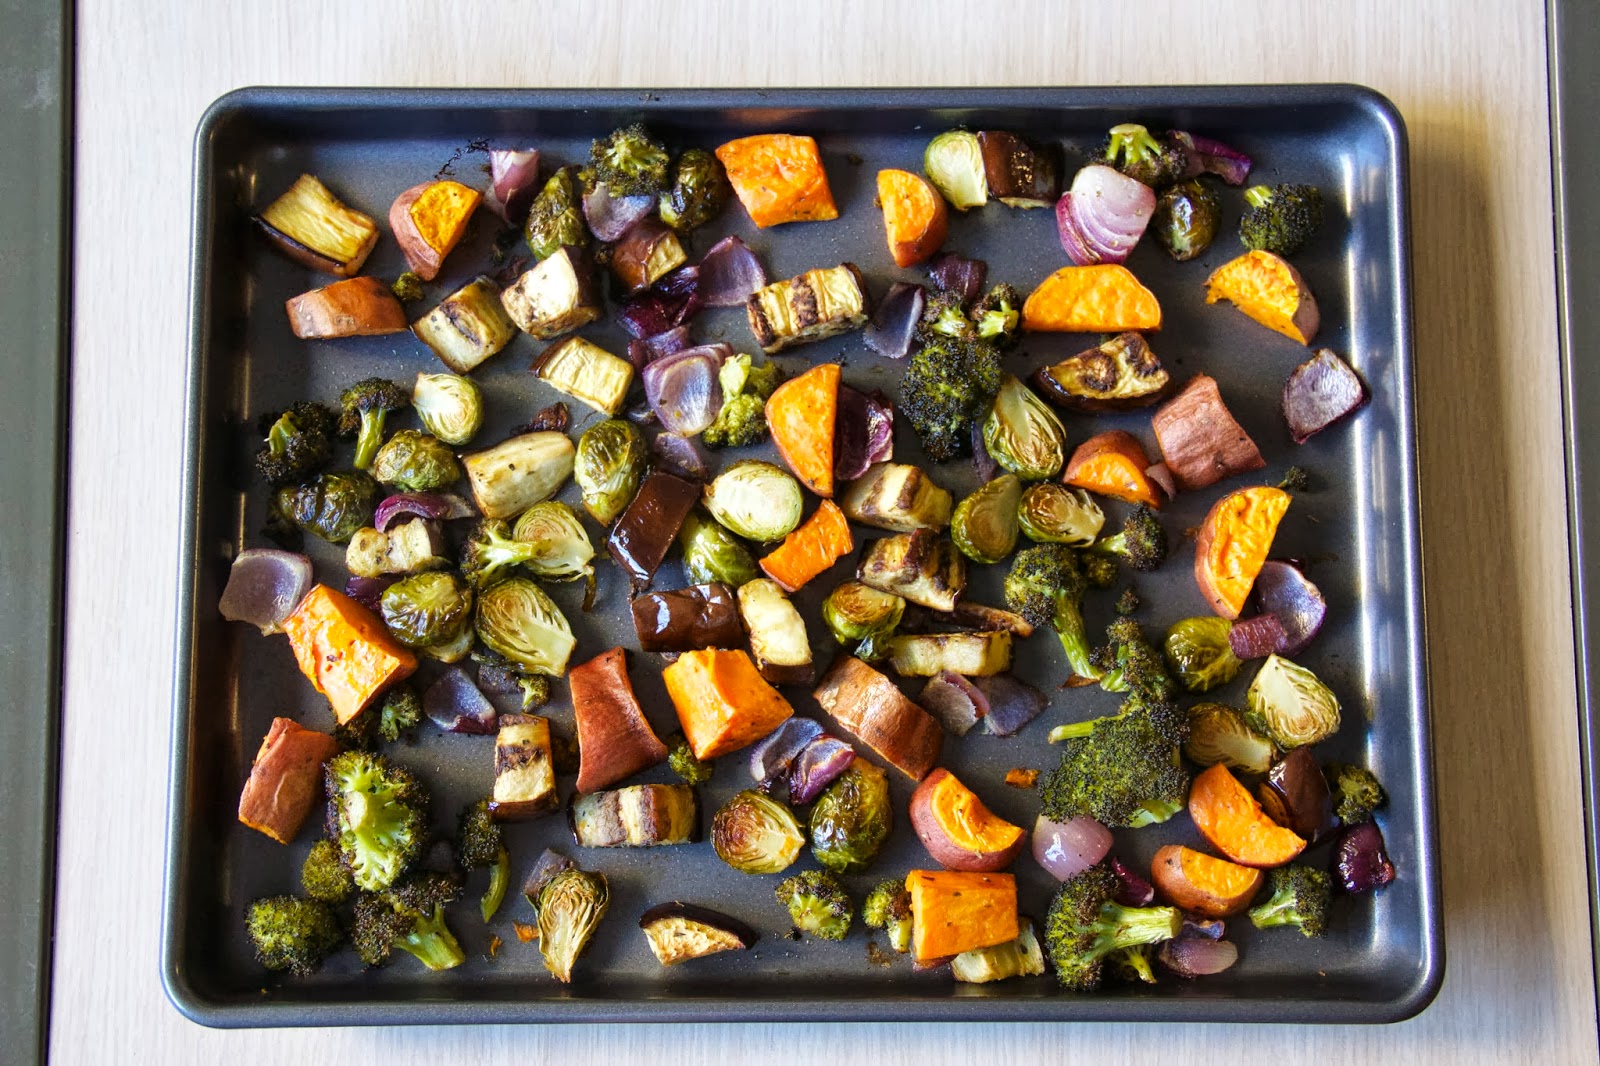
You'll know the vegetables are done when a fork inserted into the sweet potatoes goes in smoothly with no resistance. Soft the whole way throughout! The broccoli florets should be a little crispy and there should be some color on everything.


Just like old times, I stood barefoot in my kitchen eating sampling straight from the pan. And man, are these good. There's something amazing about roasting vegetables... they get beautifully tender and sweet and so flavorful. I made a batch on Sunday for lunches from Monday to Wednesday, and this batch should get me through Saturday's lunch. They're delicious, filling, and perfect for those fall days.

All in all, roasted vegetables take about an hour to make. You can really chop the vegetables haphazardly and just throw them into the pan. I did homework while I waited for these to cook, and once they were cool enough, I threw them into a tupperware container for Thursday's lunch. Simple and so, so yummy!

My parents are coming out to visit next week so I may whip up a batch of scones for their visit. I've also had cakes on my mind lately so we shall see where that takes me...

Pin It Now!

Tuesday, October 8, 2013

Peanut Butter Swirl Brownies

It was inevitable, really. I've been interested in cooking and baking since I was four and I have never made brownies from scratch before this recipe. Really. Never.


Well, folks, it has finally happened. I took the plunge and deviated from my usual Ghiradelli Triple Chocolate brownies for some homemade chocolate-y goodness. I used an extremely basic brownie recipe, and added a ton of chocolate chips and a peanut butter swirl. Let me tell you, this one is a winner. I gave literally all of them away so they wouldn't sit in my kitchen. All my friends were texting me telling me how amazing these were. Trust me, totally worth the effort.


You will need:
 -8 oz semi-sweet baking chocolate
 -1/4 cup of unsalted butter
 -1 cup of dark brown sugar, packed
 -1 tsp vanilla extract
 -1/2 cup all-purpose flour
 -1 tsp baking powder
 -1/2 tsp salt
 -2 large eggs, room temperature
 -3/4 cup of chocolate chips
 -1/3 cup of smooth peanut butter

Oven temp: 325˚F.


Start by taking your chocolate and breaking it into smaller pieces. I thought I was going to use the knife and then I realized that Baker's chocolate is meant to snap easily, so the knife was for decoration. Looks legit though, so I suppose that's all that counts?


Melt your chocolate and butter in a bain marie.

Disregarding the French name, it's actually a super easy way of melting sensitive ingredients without any danger of water contamination or burning. You'll set up the bain marie by filling a saucepan with a few inches of water, then heating to a nice simmer. Place a heatproof bowl snugly over the top, making sure the bottom of the bowl doesn't touch the surface of the water. Boom! That's it! Place your chocolate and butter in the bowl and stir constantly until everything's fully melted and combined, about five minutes. Once it's done, set aside for another five minutes to cool.


Add the sugar to the cooled chocolate mix. Stir it up really well, because you do not want any lumps!


It will look very grainy once all the sugar has been incorporated. Make sure you scrape the bottom of the bowl as you mix so that you don't miss mixing anything in.


Add eggs one at a time to the mixture. Crack one in, then mix like crazy. The batter will get much more liquid-y as you mix, but make sure that all of the first egg is incorporated before you add the second egg! You want no bits of raw egg visible in the mix.


In a separate small bowl, mix together the flour, salt, and baking powder. It's that straightforward!


Add the flour mixture to the chocolate mixture. You can just throw it on in there...


...and stir it up! Again, make sure that you are completely combining the two mixtures. Scrape the sides and the bottom of the bowl in order to confirm that you're not missing out on anything.


Hey, this looks familiar, right? This is when I started to breathe easier because it looked a heck of a lot like the premade brownie mixtures of my past. The batter should be completely smooth and reasonably runny. Make double sure that there are no clumps of flour left in the batter!


Now, add your chocolate chips. I added 3/4 of a cup, but feel free to scale down or up as needed. I found that these made the brownies extremely chocolate chip-y, but that's really how I like them. They would still be delicious without, I'm sure! You could also add peanut butter chips or nuts if you so desire. Just chuck 'em in and mix it all up.


Pour/dollop the batter into a greased baking ban. My apartment only has a 13x9 pan so I used that... honestly, sometimes I think my blog could be accurately titled "Janky Kitchen Adventures" but I don't think it's super catchy.


For the peanut butter swirl: Microwave the peanut butter in ten second increments until it's very runny... obviously a scientific term. Once it's sufficiently liquified, pour it on top of the brownie batter and run your knife through it a few times. I tried to get it sort of evenly distributed, but it's not a huge deal. Think of it as avant-garde baking.


Here you can see the method to the madness in greater detail. It's really that easy--stick your knife in the mix and drag it around.

Now, stick the brownies in the oven. I kept mine in for 27 minutes and they were a little gooey for my taste, so I would recommend keeping them in for thirty minutes. Check for doneness when a toothpick (or in my case, a knife) comes out clean.

For smaller pans (8x8, 9x9) I would guess that they would take closer to forty minutes. However, check for doneness regularly by the toothpick test and noticing if the brownies are pulling away from the edges of the pan.


Since these were pretty thin brownies, I gave my friends huge pieces. And dang, were they a hit. Rich chocolate flavor, with molten chocolate chips, and that delicious peanut butter undercurrent... yum. I'm insanely proud of my first foray into brownies from scratch!


These took about an hour to make, start-to-finish. While I will never discourage the use of Ghiradelli mixes (let's be real, they're dang good), I have to say that homemade brownies are simply incomparable. They are gooey, rich, and absolutely delicious. I highly recommend these for an easy recipe that produces some show-stopping brownies.

Also, in humble-brag news, my amazing friend Natasha interviewed me for part of an article on O2 Max Fitness about how to eat healthily in college! I'm so honored and flattered that people besides my parents (love ya, mum and dad) read this little blog. You can find the article here.

Pin It Now!

Thursday, October 3, 2013

Chimichurri Burrito Bowl

It's probably lucky that I have to ride my bike for a solid five minutes and across a few pesky traffic lights to get to Chipotle. I'm minorly obsessed with simple, Mexican-style food at reasonable prices, but the trek is sometimes a little too much for a straightforward and easy meal.

Thankfully for my wallet and waistline, I simply don't have enough time to head over to the Chipotle down the street. However, since I've been craving some burrito bowl action, I decided to take matters into my own hands--with a DIY burrito bowl.


For a few weeks, I've contemplated exactly how I'd attack it. There's the obvious cilantro lime rice, the black beans, the lettuce, and the avocado, but what else? I floundered for a few weeks, ignoring the obvious and basic salsas, until a friend sent me this link to an Avocado Chimichurri Bruschetta recipe. And then, that was that. The very next day, this creation was made: the Chimichurri Burrito Bowl. Armed with my roommate D's fancy camera, I set out to share this creation with the world... but mostly with my stomach.

For those of you who have yet to experience the deliciously amazing world of chimichurri, let me give you a brief rundown. It's an Argentinian sauce used for flavoring foods, similar to salsa. Straightforward, right? Nobody knows exactly where the name comes from, but everyone thinks that the British bastardized some Spanish words to create the name. (Thanks, Wikipedia!)

Now that you know, it's time to get cookin'.


You will need:
 -1 cup of dry black beans
 -1 cup of dry white rice
 -2 tbsp + 1 tbsp of lemon juice
 -2 tbsp red wine vinegar
 -3 cloves of garlic, minced
 -1/2 tsp salt
 -1/2 tsp red pepper flakes
 -1/2 tsp dried oregano
 -1/4 tsp ground black pepper
 -1/4 cup of olive oil
 -1/2 cup + 1/4 cup of chopped cilantro
 -1/4 cup of chopped parsley
 -1/2 avocado
 -2 handfuls of lettuce

If you're smarter than me, you'll get your beans cooking as soon as possible, or you will buy them pre-cooked. I thought I'd be thrifty and buy the dry beans, so I had to go through the process of rinsing, soaking, rinsing again, then cooking. If you do this, just follow the instructions on the bag and account for time. Mine took about an hour and a half to two hours, so plan accordingly.


You'll start by roughly chopping your parsley and 1/4 cup of cilantro for the chimichurri. You want the chimichurri to sit for an hour or two to let the flavors truly mingle. While this may seem a bit unnecessary, it's completely worth it.


Very simply, you'll whisk together the lemon juice, vinegar, oregano, salt, pepper, red pepper flakes, and garlic in a bowl. I used a big bowl because the bowls in our kitchen come in two sizes: tiny or huge, and I thought huge would be tidier than tiny. That's decent logic, right?

Next, whisk in the olive oil gradually. Pour in a little bit at a time, whisk it all around, then pour some more. It should take at least a full two minutes.


Once that's all incorporated, stir in the parsley and your 1/4 cup of oregano. Mix it all together really well, then pop it into the fridge until it's time to assemble the meal. Isn't that easy now?


Once your beans have about thirty minutes left of cooking time, you can get started on your rice. Bring 1 and 3/4 cups of water and 1 tbsp of lemon juice to a boil, then add a cup of dry rice. Follow the directions on your bag, but it'll probably tell you to simmer, covered, for about twenty minutes. Once it's cooked, uncover it, and stir in your remaining 1/2 cup of chopped cilantro. The heat from the rice will wilt it a little, but the cilantro will release its delicious flavors even more.

Now, it's assembly time. See, wasn't that fast?


Throw two healthy handfuls of lettuce into a bowl. I used another gigantic bowl, just so I could mix around all the ingredients once I started consuming my meal. On top of the lettuce, place about 1/2 cup of cooked rice. Marvel at how awesome it already looks.


On top of the rice, add about 1/2 cup of cooked and (mostly) drained black beans. Keeping a little bit of the juice adds a nice depth, I think, to the acidity and kick of the chimichurri.


Now, spread a heaping spoonful of chimichurri atop your creation. Don't worry about mixing it all together just yet, since you'll plonk half a sliced avocado on top of it all. Sprinkle with black pepper and you're set!


Of course, burrito bowls are meant to be enjoyed all cut up and mixed together! The chimichurri acts as a really delicious and acidic dressing for all the ingredients, and the avocado lends a creaminess to the dish. Add that to the clean crispness of the lettuce, the starchiness of the rice, and the protein of the beans, and you've got one heck of a meal.

Once I had taken a few bites and realized I hit a home run with this recipe, I went straight across the hall to make my friends try it and tell me what they thought. Two brief quotes: "Yum. Literally the only word I can use for this. Yum." and "This is definitely the best thing you've ever made that I've eaten".

What definitely tied the burrito bowl together was the chimichurri. Without it, the bowl would have been a dry, sad excuse for a pseudo-Mexican meal. The sauce elevated it to an awesome level, part salad dressing and part salsa. It does have a bit of a kick, but I can easily imagine it in a grilled cheese sandwich, or taking the place of pesto in a pasta dish.


Naturally, my burrito bowl was consumed tidily and gracefully (ha) right before hockey practice. I had just enough time to finish eating and put away the leftover beans and rice for another burrito bowl... which, let's face it, will probably happen tomorrow. Just pop the beans and rice in the microwave for twenty or thirty seconds to warm them up and you're back in business.

All in all, a delicious, straightforward, and cost-effective meal that will definitely provide plenty of leftovers for the week's remaining lunches and dinners.

Pin It Now!